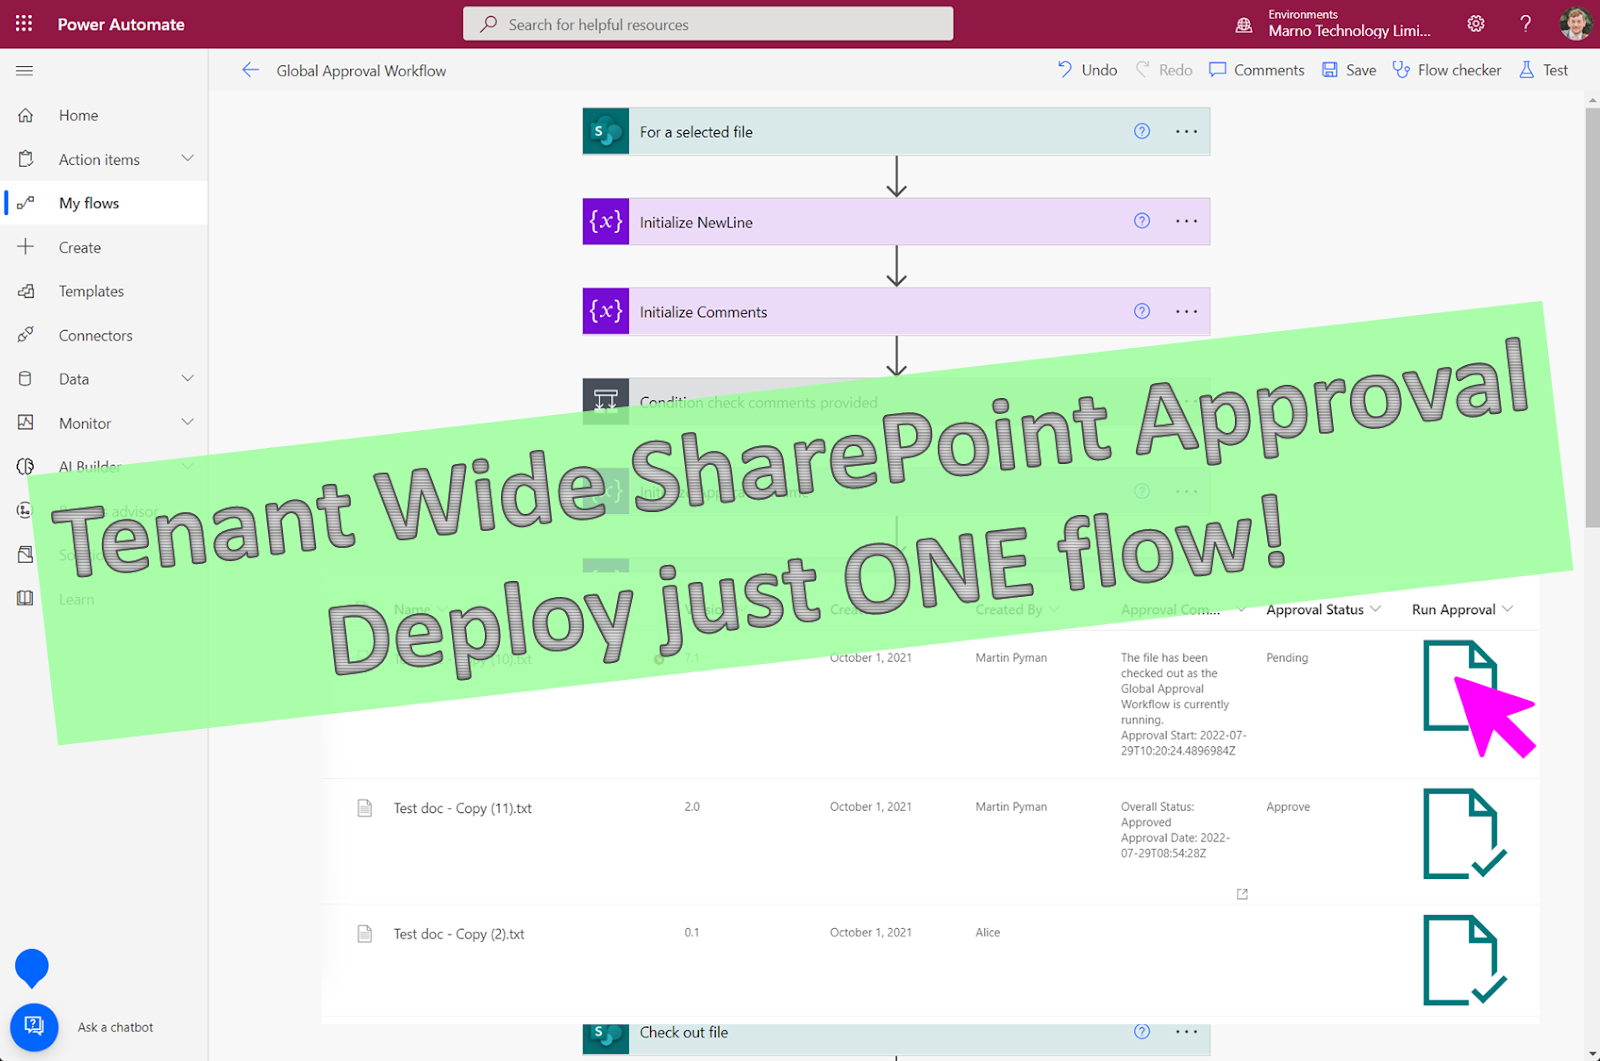
The following provides a guide on how to add an approval Power Automate workflow to any Document Library in your tenant just by adding a JSON formatted column to your library!
A previous client had a requirement to create some global approval templates across the whole of their SharePoint Online Tenant. Power Automate is a great tool for this with its integration with Microsoft Approvals which gives the end user a slick experience being able to approve/reject documents from email or Teams.
The problem with most approval templates is an individual workflow has to be deployed to every Library as they run on the "For a selected file" step, which can't be dynamic... or can it!?
My colleague Robin Pemberton created an original set of approval templates, one with a multi-step approval, one where everyone must approve, one where only one person needs to approve which we then provided to the business on how to deploy this to their SharePoint libraries, with a long set of instructions, but Robin had used the REST api to minimise the changes they needed to make in the Power Automates when they deployed them in their libraries.
Whilst discussing JSON buttons with someone in the business and how they'd created a "Run Approval" button I found with a few tweaks we could have a completely centrally managed set of Approval templates and the only instructions for someone to deploy it would be to create some Library columns, a copy and paste of JSON formatting and that was it. You could even deploy this json button with a PnP script to all your libraries in a Site/Tenant if you wish:
I've recreated an example below for you to follow:
- Gather the Approver(s) and Comments from the user running the flow
- Initialise the variables
- Get the "ListItemEntityTypeFullName" from the list (this is needed to update the file properties using REST)
- Check out the file and update the Approval Status to "Pending"
- Start and wait for the approval
- Check if the file was modified during the approval, if it was cancel the approval as we don't want the user who requested the approval to modify the file whilst it's being approved!
- Gather the approval information
- Update the files properties "Approval Status" and "Approval Comments" field
- Check in the file
- Email the original requester the result
Prerequisites
Two new columns:
- Approval Status (internal name ApprovalStatus) - Single line of text
- Approval Comments (internal name ApprovalComments) - Multiple lines of text
- A column to hold the Approval button - A single line of text field is fine here
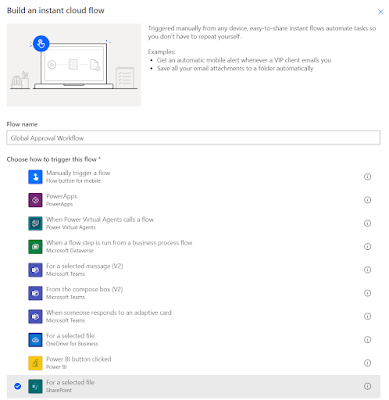
Create a new "instant cloud" flow and select the "For a selected file" as the first step and give it a useful title, mine is called "Global Approval Workflow":
1. Gather the Approver(s) and Comments
We first need to gather some information from the user running the Approval, who needs to approve the item and comments they wish to provide as part of the approval, to do this add the inputs to the first step in your flow, similar to the below:
The site address and library are important, you need to attach this to a library and Site accessible to everyone in the organisation (you can find out more at the end of this blog).
Note: I've made the Comments field optional.
You can also now cheat and just download the solution, make sure you test as this code is not a production copy! Instructions to allow it to import are included on GitHub.2. Initialise the variables
This flow makes use of the following variables:
| Variable Name |
Type |
Value |
QueryStringParams
| Array |
@{split(split(triggerBody()?['entity']?['itemUrl'], '?')[1], '&')}
|
| ApplicationName | String | Global Approval Workflow (or what you would like as the name of the flow in the Emails sent) |
| NewLine | String | (Insert a single return character in this, yup just hit Return when in the Value column) |
| ApprovalStatus | String |
|
| Comments | String |
|
SiteUrl
ListId | String
String |
|
The condition during setup is to check if the Comments field has any value, if the user leaves this blank the whole parameter is missing from the JSON packet so we need a condition to handle this:
@equals(triggerBody()?['text'], null)
2. Initialise the Variables - SiteUrl and ListId
The following are examples on extracting the correct SiteUrl and ListId depending on two types of initiation, a Classic SharePoint Site Collection or a Modern Site Collection, each return different references to the ItemUrl so there are two condition steps included on the flow:
Classic:
https://<tenant>.sharepoint.com/sites/classicexample/project1/_layouts/15/Doc.aspx?sourcedoc=%7Be4bb722a-0067-4cb1-8302-43435f930542%7D&action=edit&uid=%7BE4BB722A-0067-4CB1-8302-43435F930542%7D&ListItemId=1&ListId=%7BDC7E516D-40AD-433F-86C2-4E7A87D08816%7D&odsp=1&env=prod
Modern:
https://<tenant>.sharepoint.com/sites/DemoSite1/Shared%20Documents/Forms/AllItems.aspx?id=%2Fsites%2FDemoSite1%2FShared%20Documents%2FItem%20%2D%20Copy%20%283%29%2Etxt&parent=%2Fsites%2FDemoSite1%2FShared%20Documents
ItemUrl contains "/Forms/"
Create a new condition step and set the "Value" to
contains(toLower(triggerBody()?['entity']?['itemUrl']), '/forms/')
Set the comparison to "is equal to" true
Create a new Apply to Each step, and process the QueryStringParams, we need to find the parameter from the original ItemUrl for the "id"
Inside the loop add another comparison, this time set the "Value" to
toLower(items('Apply_to_each_QueryString'))
Set the comparison to "starts with" "id="
In the If yes section we need to gather the relevant information from SharePoint
Create a new HTTP SharePoint request with the following parameters:
Site Address: @join( take(split(triggerBody()?['entity']?['itemUrl'], '/'), 5), '/')
Method: GET
URI: _api/web/GetFileByServerRelativeUrl('@{split( items('Apply_to_each_QueryString'), 'id=')[1]}')/ListItemAllFields/ParentList/ParentWeb/Url
Headers:
Accept: application/json;odata=verbose
Content-Type: application/json;odata=verbose
Following this we can now set the SiteUrl Variable:
@{body('HTTP_Get_Parent_WebId')['d']['Url']}
Repeat for the ListId:
Create a new HTTP SharePoint request with the following parameters:
Site Address: @variables('SiteUrl')
Method: GET
URI: _api/web/GetFileByServerRelativeUrl('@{split( items('Apply_to_each_QueryString'), 'id=')[1]}')/ListItemAllFields/ParentList/Id
Headers:
Accept: application/json;odata=verbose
Content-Type: application/json;odata=verbose
Following this we can now set the ListId Variable:
@{body('HTTP_Get_Parent_ListId')['d']['Id']}
ItemUrl Contains Layouts:
A new Condition is now needed on the main branch:
@contains( toLower(triggerBody()?['entity']?['itemUrl']), '/_layouts/15/doc.aspx')
Is equal to:
true
Add a Set Variable set to configure the SiteUrl:
@{split(triggerBody()?['entity']?['itemUrl'], '/_layouts/15/Doc.aspx')[0]}
Add an Apply to Each step to run through all the QueryStringParams
Add a condition step Condition Value:
@toLower(items('Apply_to_each_QueryStringParameter') )
Starts with:
listid=
In the If yes add a Set Variable for the ListId:
@{replace ( replace( toLower(items('Apply_to_each_QueryStringParameter')), 'listid=%7b', ''), '%7d', '')}
Note: There may be other niche ways the URL is returned definitely test this out with multiple sites, libraries and users!
3. Get the "ListItemEntityTypeFullName"
The next step is to retrieve the ListItemEntityTypeFullName, it's needed to send updates to the SharePoint Library via the REST api. It's quite easy to grab:
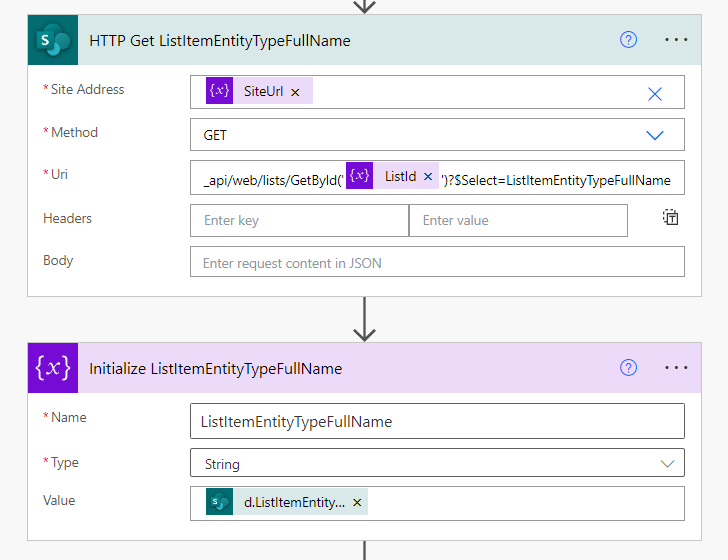
Uri:
_api/web/lists/GetById('@{variables('ListId')}')?$Select=ListItemEntityTypeFullName
Initialize variable value:
@{body('HTTP_Get_ListItemEntityTypeFullName')['d']['ListItemEntityTypeFullName']}
4. Check out the file and update the status
The check out file step uses the inbuilt method available, here you want to enter custom values for the Site Address (variable SiteUrl) and the Library Name (variable ListId).
The ID is the ID from the "For a selected file" step.
I then use two parallel steps - if the checkout process fails it notifies the user that the file is likely already checked out and needs to be checked in before they can run the approval.
Note: When configuring this flow I needed to email the @{triggerOutputs()['headers']['x-ms-user-email']} variable, when I selected the email address from the dynamic content it was throwing me an ID. This might have been a bug at the time I created the flow.
The first post step to update the status to "Pending" uses the "Send an HTTP request to SharePoint":
Site Address: @variables('SiteUrl')
Method: POST
URI: _api/web/lists/getbyid('@{variables('ListId')}')/items('@{triggerBody()?['entity']?['ID']}')
Headers: Accept: application/json;odata=verbose
Content-Type: application/json;odata=verbose
X-HTTP-Method: MERGE
If-Match: *
Body:
{
"__metadata": {
"type": "@{variables('ListItemEntityTypeFullName')}"
},
"ApprovalStatus": "Pending",
"ApprovalComments": "The file has been checked out as the @{variables('ApplicationName')} is currently running.
Approval Start: @{triggerOutputs()['headers']['x-ms-user-timestamp']}"
}
5. Start and wait for the approval
Before and after the approval I fetch the file properties. This is to be able to detect if the file changed during the approval (i.e. the user made some edits to their file whilst it was being approved - which we don't want).
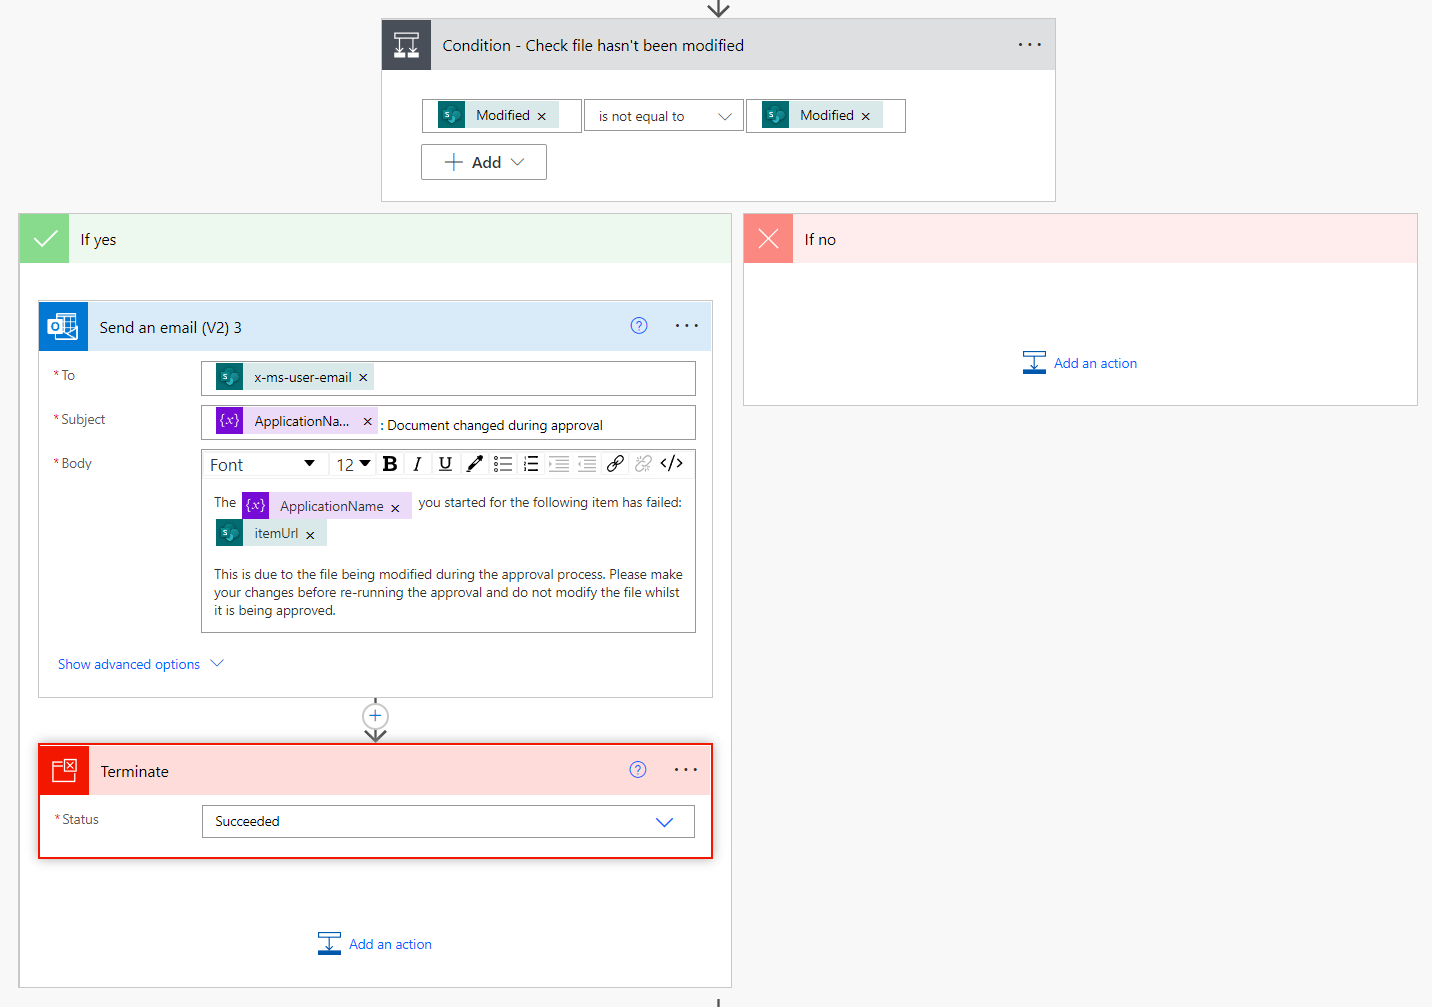
6. Check if the file was modified during the approval
I compare the two modified dates of the Get file properties steps:
@body('Get_file_properties_after_Approval')['Modified']
@body('Get_file_properties')['Modified']
The email you send back to the user is up to you, this step can even be skipped if you are creating a review workflow. The terminate I close as a Success, this is to reduce the emails back mentioning "The following flows have failed in the last x"
You can move your other code into the If no section - but I like to keep as much of the code visible in the main body to aid debugging so I make use of the terminate step quite often.
7. Gather the approval information
The outcome text from the Approval isn't perfect "Approve" / "Reject" so I add a condition to set the "ApprovalStatus" string to past tense.
I reuse the "Comments" string to now add useful information about the approval which will be saved to SharePoint and emailed back to the user.
As the method of approval I'm using has the possibility of multiple approvers, I append these to the Comments string so each approver's response and comments are included.
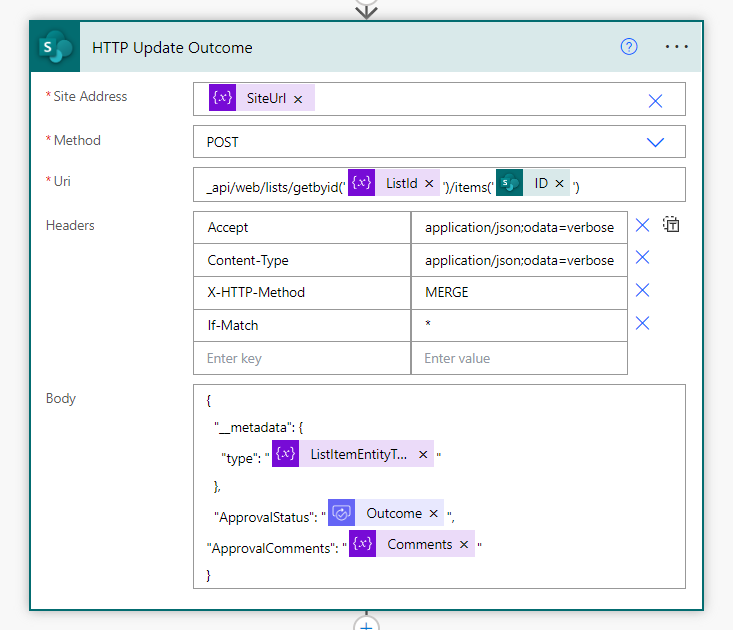
8. Update the Approval Status on SharePoint
The files information is then updated on SharePoint. The following configuration is used in a "Send an HTTP request to SharePoint" step
Site Address: @variables('SiteUrl')
Method: POST
URI: _api/web/lists/getbyid('@{variables('ListId')}')/items('@{triggerBody()?['entity']?['ID']}')
Headers: Accept: application/json;odata=verbose
Content-Type: application/json;odata=verbose
X-HTTP-Method: MERGE
If-Match: *
Body:
{
"__metadata": {
"type": "@{variables('ListItemEntityTypeFullName')}"
},
"ApprovalStatus": "@{outputs('Start_and_wait_for_an_approval')?['body/outcome']}",
"ApprovalComments": "@{variables('Comments')}"
}
9. Check in the file
Nearly there:
10. Email the original requester the result
I compose the body of the email outside the Send an email V2 step, this is because I have a href with a variable and Power Automate does weird things with that when you save and open the file:
The approval workflow has complete for your document:<br>
<a href="@{triggerBody()?['entity']?['itemUrl']}">@{triggerBody()?['entity']?['fileName']}</a><br>
The overall outcome is: @{variables('ApprovalStatus')}<br>
<br>
The approval summary is included below:<br>
@{replace(variables('Comments'), variables('NewLine'), '<br>')}
The Magic
Approval Button
The deployment of the button couldn't be easier this is the JSON formatting you need to add to the column however the ID of the flow you need to update (highlighted in bold). You can find the ID for your flow from the URL in your browser, when you are editing the flow it'll be the last digits after the last forward slash. Include the dashes.
Note: This will only work if you have your flow in your default environment, if you have created it in another Environment you will need to go to the flow details, select Export and then select "Get flow identifier" you'd then use that in the actionParams.
{
"$schema": "https://developer.microsoft.com/json-schemas/sp/v2/column-formatting.schema.json",
"elmType": "button",
"customRowAction": {
"action": "executeFlow",
"actionParams": "{\"id\": \"54a4e14c-3591-43d6-bd8e-4e0d8a828181\"}"
},
"attributes": {
"class": "ms-fontColor-themePrimary ms-fontColor-themeDarker--hover"
},
"style": {
"border": "none",
"background-color": "transparent",
"cursor": "pointer"
},
"children": [
{
"elmType": "span",
"attributes": {
"iconName": "DocumentApproval"
},
"style": {
"padding-right": "16px"
}
}
]
}
Deployment and Permissions
For everyone in the organisation to be able to run the flow you need to deploy it to a library where everyone in the organisation has access. If you have a site which you know is globally accessible, I suggest you make a template list in there where you can attach the first step of this workflow to. You then need to either make sure the whole site is shared or just the document library.
In the flow details you can then select the "Run only users" section and click Edit
Click on the "SharePoint" tab and select the site and List/Library in the drop downs, they should be automatically populated once you have setup at least the first flow step.
You can find the package and instructions on deploying it to your tenant on GitHub:
https://github.com/martinpyman/Global-Power-Automate-Approval






Comments
Post a Comment