Power Automate - Update SharePoint item metadata using only variables
When you use the inbuilt Power Automate SharePoint "Update item" or "Update file properties" and want to use a variable for that, you lose all the prepopulated columns:
For general quick Power Automates - "Update item" is fine, but if you work with other developers or promote these across Power Platform Environments and hook them up to different lists/libraries, you may want to be able to quickly set that information at the top of the Automate. Not have to scroll through tens/hundreds of steps to change the target list URL everywhere.
This is where "Send an HTTP Request to SharePoint" comes in, you just have to know how to use the SharePoint REST API, or follow my guide below.
My Target library has two additional metadata columns which I'll show you how to update, "Document Type" and "Item Types", the latter being a choice field.
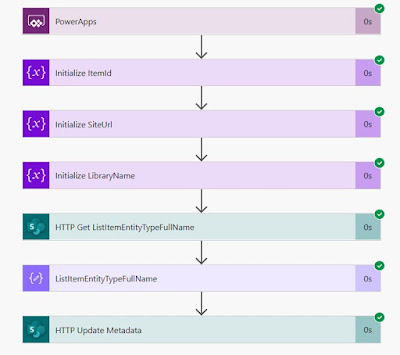
Next I setup the site URL and the library name into variables, this is where, when I'm working with other developers, we have different sites for different versions of an app, e.g. Dev, Test, Prod.
You then need to get a "ListItemEntityTypeFullName" this is used to pass the type of item the final HTTP request call is updating. Once I've done this I run the script. You need to copy the body output to use on the next Parse JSON step.
The step below "Parse JSON" is used to interpret what was returned from the previous step so I can use the variable "ListItemEntityTypeFullName" in my Automate. Once you've run the steps above you copy the "body" output from the HTTP request and paste this into the "Generate from sample" section below.
This is the final piece of the puzzle, the actual HTTP request to update the items metadata, however, once you get used to using it you can copy and paste this around in your Automate to update metadata depending on your logic.
Ensure you put the headers into the request, below is the format for the Body section:
{'__metadata': { 'type': '@{body('ListItemEntityTypeFullName')}' } ,'DocumentType' : 'Paperback' ,'ItemType' : 'Book'}
I've hard coded the changes into this for the demo - but you can change these easily for variables.
The example here is how you would update a standard field and also a choice field, but this blog below gives you all the examples you'd need to update other types of columns:
This might seem a bit taxing - but if you are reading this far then you probably had good reason to use variables, they certainly help in the development cycle.
Hope it helps


Comments
Post a Comment